Set up Ocean Commitments
Cloud service provider relevance: Azure Kubernetes
Before you can turn on commitments for your cluster or virtual node groups, you need to:
- Purchase Azure commitments (refer to Azure)
- Get your Azure credentials.
- Connect Commitments to Spot Products.
Once you have your Azure credentials, you can turn on commitments from either the Spot console or the Spot API.
Get the Azure Credentials Required to Connect Commitments to Spot Products
Follow the instructions below while referring to the Azure documentation:
App Registration
-
Log in to your Azure account.
-
Go to App Registration.
-
Create a new application registration.
-
Set the Redirect URI to
https://spot.ionoteSpot requires this URI for authentication purposes.
-
Copy the following IDs (you will need them later to connect to Spot):
- Application (client) ID.
- Directory (tenant) ID.
Certificates & Secrets
- In Azure, under the newly created application, click Certificates & secrets.
- Create a new client secret and set the expiration to 24 months.
- Copy the following details (you will need them later to connect to Spot):
- Application secret expiration date.
- Client secret value.
Connect Commitments to Spot Products
-
Obtain the credentials from your Azure app. Refer to Get your Azure credentials
-
Go to the virtual node group where you want to enable utilize RSs/SPs. This can be any of your virtual node groups, but It is recommended to enable utilize RSs/SPs on the virtual node group template (default) so that it is applied to all virtual node groups in the cluster. See Manage AKS Virtual Node Groups.
-
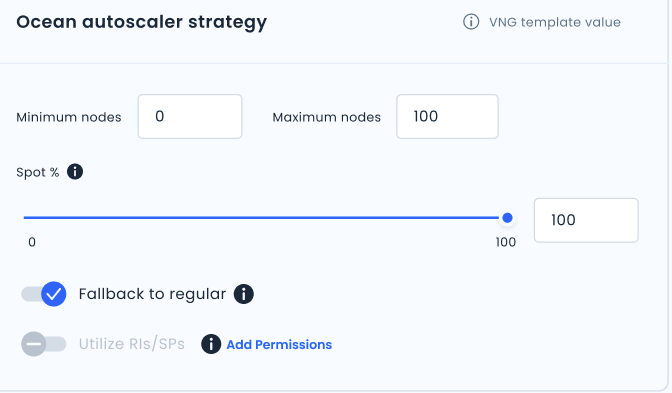
In the Ocean autoscaler strategy area, next to Utilize RIs/SPs, click Add permissions.
Step 1: App Registrations
-
In Connect RIs/SPs to Spot wizard, step 1, create (register) a new Azure app or upgrade an existing one.
Upgrade:

New:

-
Copy the following credentials from your Azure app and paste them into the fields:
- Application (client) ID.
- Directory (tenant) ID.
-
Go to Step 2: Certificates and Secrets
Step 2: Certificates and Secrets

-
Copy the following credentials from your Azure app and paste them into the fields:
- Application secret expiration date.
- Client secret value.
-
Go to Step 3: Permissions assignment.
Step 3: Permissions Assignment

- The first time you use commitments; you must add at least one permission at the tenant level, so Spot can connect to Azure environments. These permissions give you access to all the resources under the same tenant. You need these permissions to turn on Ocean commitments.
- In addition, you must add the custom reader role. This subscription role permission grants controlled access to Azure resources within a subscription and enables custom read-only visibility while preventing unauthorized modifications.
- If this step is unsuccessful, check your Azure environment.
-
Select the custom reader role, and the permissions in accordance with those you purchased from Azure (by default, both RI and SP are selected).
-
Use the following Azure PowerShell script to assign the Reservation Reader / Savings Plan Reader roles at the tenant level:
Import-Module Az.Accounts
Import-Module Az.Resources

Connect-AzAccount -Tenant {TENANT_ID}

## Assign Reservation Reader role
New-AzRoleAssignment -Scope "/providers/Microsoft.Capacity" -ApplicationId {CLIENT_ID} -RoleDefinitionName "Reservations Reader"

## Assign Savings Plan Reader role (optional)
New-AzRoleAssignment -Scope "/providers/Microsoft.BillingBenefits" -ApplicationId {CLIENT_ID} -RoleDefinitionName "Savings plan Reader" -
Use the following Azure PowerShell script to assign the Custom Reader role:
# Replace with your principal's object ID (user, group, or service principal)
$principalId = "<YOUR-PRINCIPAL-ID>"

# Replace with your custom role name (from your JSON)
$roleName = "Custom Reader Role"

# Path to your custom role definition JSON file
$roleFile = "custom-role.json"

# Create the custom role
az role definition create --role-definition $roleFile

# Assign the custom role to all subscriptions
$subscriptions = az account list --query "[].id" -o tsv
foreach ($sub in $subscriptions) {
    Write-Host "Assigning role to subscription: $sub"
    az role assignment create `
        --assignee $principalId `
        --role $roleName `
        --scope "/subscriptions/$sub"
}

# For management groups, use the following:
$managementGroups = az account management-group list --query "[].name" -o tsv
foreach ($mg in $managementGroups) {
    Write-Host "Assigning '$roleName' to principal at MG: $mg"
    az role assignment create `
        --assignee $principalId `
        --role $roleName `
        --scope "/providers/Microsoft.Management/managementGroups/$mg"
} -
Click Test RIs/SPs to Spot Permissions to verify that your permissions have been successfully granted.
Turn on Utilize Commitments from the Spot Console
-
Go to the virtual node group where you want to enable utilize RSs/SPs. This can be any of your virtual node groups, but It is recommended to enable utilize RSs/SPs on the virtual node group template (default) so that it is applied to all virtual node groups in the cluster. See Manage AKS Virtual Node Groups.
-
In the Ocean autoscaler strategy area, click Utilize RIs/SPs.
If the Add permissions link appears, and Utilize RIs/SPs is grayed, make sure you have completed the following tasks with no errors:
Turn on Utilize Commitments for Ocean in the Spot API
In the Spot API, for virtual node groups/clusters, the shouldUtilizeCommitments attribute controls utilization commitments.
When True (default), and there are free reserved instances / savings plans within the AWS account, Ocean will utilize them before launching spot instances.
The initial virtual node group default value is inherited from the identical attribute at the cluster level.
- Create cluster or Update cluster (under virtualNodeGroupTemplate > strategy)
- Create virtual node group or Update virtual node group (under virtualNodeGroup > strategy)